Taking Samples
Taking Samples
Taking representative samples is vital to accurate analysis. It is important that personnel taking samples are well trained and understand the importance of a quality sample.
For larger or more complex machines there may be a number of sample points possible, each potentially answering a different question about the system. This could be about the condition of the oil as it arrives to lubricate a key component, the wear debris being generated by a particular component, ingress of contaminants in specific parts of the oil system, filter efficiency and other specific information. As it is not practical to sample from every conceivable location a primary sample point needs to be chosen. This data can then be augmented by samples from the secondary sample points as and when required.
When picking a primary sample point be mindful of the following:
- Ingression points – where possible, locate the sampling points downstream of components that produce wear debris or ingress particles and moisture. Return lines provide the most representative samples. Once the oil reaches the tank this information becomes diluted.
- Filtration – filters and separators are contaminant removers, therefore they can remove valuable data from the oil sample. Always locate the sampling points upstream of the filters unless it is the filter performance that is specifically evaluated.
- Turbulence – the best sampling locations are highly turbulent. If a sampling valve is located at a right angle to the flow in a long straight length of pipe any particles present in the oil are likely to fly by with the flow. It is recommended that the sampling ports are placed in the elbows and sharp bends in the flow line.
- Where possible take the samples when the components are operating under normal working conditions. If that is not possible take samples as soon as possible after shutdown, provided the machine has been run until reaching the standard operating temperatures and conditions.
- Ensure that all sampling equipment is either clean or thoroughly flushed prior to taking the sample. Some sample points will need flushing with several litres of oil before locally accumulated contamination is removed and a representative sample can be drawn.
- Create specific written instructions for sampling personnel. These help ensure consistency and make training of further personnel easier.
Remember that taking a sample is also an opportunity for a quick visual/hands on inspection of the machine and its environment and an oil level check.
Depending on the capacity of the oil system and the sample volume taken, make up oil may need to be added to the machine to avoid oil starvation. Regular sampling and replenishment will affect the concentration of wear metals and contaminants and over time may have a significant impact on the oil properties. By informing the lab of the volumes added this dilution effect can be taken into account while diagnosing the sample. It is nonetheless preferable and more economical to only remove the necessary amount to enable analysis and to top up with care.
How to send in a good sample and what information to provide
After extracting a good sample from your machinery the next step is to ensure that the sample arrives at the lab safely and has with it all the information necessary for analysis and reporting.
Let’s start with the basics:
- Firstly, ensure sufficient sample volume is being sent to enable all the analysis requested (check with the lab if unsure, but ~75-100ml is ideal for Package B/E, additional tests may require greater volume – 250ml/500ml/1L or even more for especially large scope of analysis).
- Do use appropriate bottles/containers. Remember we can supply sampling containers free of charge (shipping charged outside mainland UK). Using second-hand bottles introduces risk of contamination with previous contents or water (if washed but not sufficiently dried). We have seen it all, from coffee jars and coke bottles to pint glasses and plastic cups. We appreciate that there may not be anything else to use in an emergency, but where possible – plan ahead and order some bottles.
- Try to keep the bottles clean, although we appreciate that not all environments allow this. Where vermiculite or other similar packing material are mandated for transit ensure there is an additional layer of packaging between it and the samples (e.g. additional sealable bag or a box within a box).
- Ensure the bottles are fully closed, but do not overtighten lids. Gassy samples (e.g. refrigerant compressors) may require partially filled larger bottles to allow room for expansion of gas.
- Label the samples with sufficient information (see below for more info and an example of a sample docket). Remember that permanent markers are oil soluble – anything written in sharpie on bottles or lids is liable to get smudged and become illegible once a few drops of oil get to them. Use labels and a ball point pen. If labels are too small to convey the necessary info, use the dockets provided or create a makeshift manifest from a suitable piece of paper that will give you room to expand on the basic ID on the labels. We can’t stress enough the importance of clear and sufficient sample information!
- If sending a single sample in multiple bottles label them exactly the same and ideally add “bottle 1 of 3”, “bottle 2 of 3”, etc, to avoid being charged for more than the expected number of samples. Some clients send in samples taken a few hours apart as part of an investigation – if samples are not labelled exactly the same they are assumed to be different. If in doubt, get in touch.
- Use overspill bags or containers provided to capture any spillages. For particularly gassy samples an additional outer overspill bag is recommended as oil may seep through the bag seal over many days in transit.
- Use a suitable box or padded envelope – it doesn’t have to be new, but must be sturdy enough to handle the journey. Check that it’s fully sealed – if the box is dusty or oily packing tape may have trouble adherening – any open flaps/holes increase risk of lost samples in transit.
- Include sufficient padding to protect the samples, especially when using glass bottles. Bubble wrap, air bags, rags, paper or foam are all acceptable, and, when the samples are protected by overspill bags, padding can be re-used.
- Apply sufficient postage or the freepost label if taking advantage of the freepost service provided. We will pay for and retrieve any under-paid items, however will have to charge for the costs incurred, this also delays analysis while the parcel is re-scheduled. We recommend that you use your own preferred courier, as this should ensure swift delivery and provide tracking information. We are also able to arrange collection by our courier – get in touch to confirm pricing (we will need package dimensions, weight, preferred collection time and address, as well as contact details for someone at the point of pick up).
You can use our sample dockets, pre-printed or generic labels or provide the necessary information by other means. Pre-filled labels can be generated from the database – see the database user guide or get in touch for a demonstration.
Remember to include the following information:
Your company name, and where necessary, department/site/office and the name of the recipient for results (unless distribution lists have been specifically set up already). This should not be the company name of your client.
Site – this may reference a building, a department or some other location or your client’s company name and location.
Unit ID – this may include a combination of a common name and a tag/serial number. The main thing is to try and be consistent. We do our best to disambiguate any confusing labels, but it makes everyone’s life easier if everything is clear from the start. For example “DE-9802 Main Engine 1 Port” may be identifiable from “Main Engine 1“, “DE-9802” or “Port Engine“, but only if the full data is already stored on the database. If those three samples were to arrive over consecutive months without the full details being available they would be recorded as three different engines. This results in disjointed histories – something we are happy to work with you to rectify, but it is easier to keep everything correct in the first place.
Sample Date – date the sample was taken. If taking multiple samples on the same day it may be worth adding time sampled or a sequential number to the samples, so we can order them correctly in the historical record. Where a date isn’t provided we will assume the date of the nearest prior working day. Dates are important in controlling the time axis for the graphs and therefore the slope of any property change. If two samples are submitted in short succession but one has no date it is possible that the default date assumed will place it out of sequence with the other sample – this may confuse the historic trend, making it harder to issue relevant comments. Please date your samples!
Hours/Miles/Kms / Equipment Hours – this is a record of the unit’s operational hours or miles/kilomoters. This data is useful in assessing the severity of any changes observed. Please provide this where able. A different metric (e.g. KWh for wind turbine application) may also be suitable, but please remain consistent.
Hours/Miles/Kms / Lube Hours – this is a record of the unit’s operational hours or miles/kilomoters on the current lubricant charge/since last oil change. This data is useful in assessing the severity of any changes observed. Please provide this where able. A different metric (e.g. KWh for wind turbine application) may also be suitable, but please remain consistent.
Lubricant Details – please supply type/grade/model of lubricant in use. Do remember to submit samples of virgin/new oil types in use. We have accumulated a significant store of reference samples, but formulations change and there is no substitute for a direct comparison to a virgin sample from the same site. As a minimum, the lubricant details will help understand the expected/desired Viscosity Grade of the lubricant and will direct our comments accordingly. Details of any recent oil changes/top ups will add context to the changes in wear elements or other parameters.
Unit Type and Label – different unit types have different tolerances for contamination and wear. Knowing unit type allows us to apply limits and comments appropriate to the system. Some larger more complex units have a number of lubricant circuits relating to different systems and filled with different lubricants – identifying the circuit correctly is an important step to accurate analysis. Please tick any/all that apply.
Urgent Turnaround – we offer an expedited turnaround (this covers routine test packages and some of the additional tests). For routine tests we aim to report within 24h of sample receipt (excluding weekends/bank holidays). If for some reason that is not possible we will do everything possible to report by the end of the following working day. Typically urgent turnaround costs double the standard rate for the same tests. The fee is there to cover the cost of set up and calibration of instruments outside of the scheduled runs, e.g. where equipment may be set up and calibrated to analyse a single urgent sample.
Other Details – use this field for any further information you wish to supply. Please include your contact details unless a default distribution list has been set up for your company.
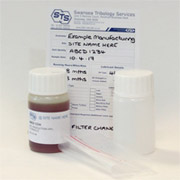
See the below example for guidance: 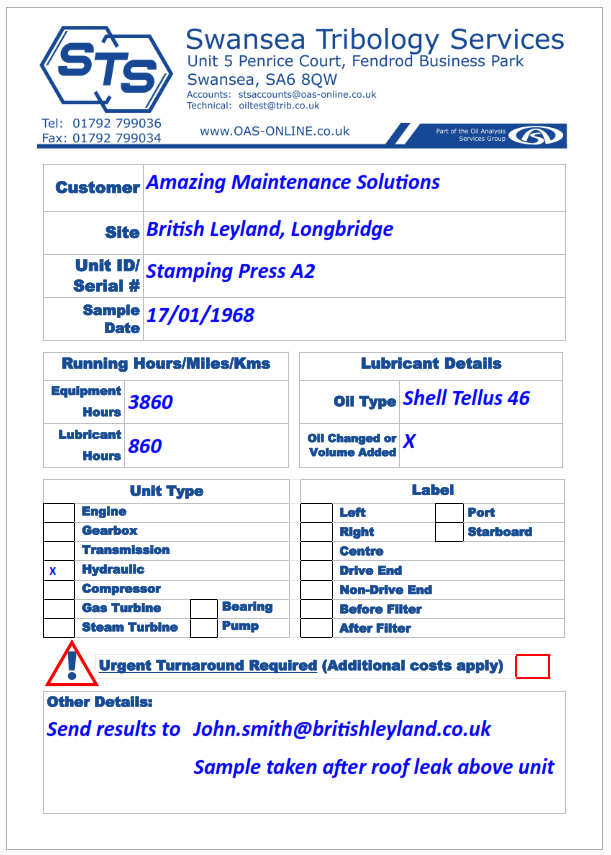
Taking samples with a Vampire pump
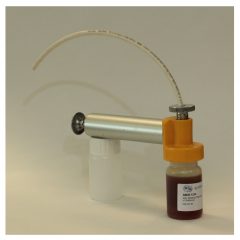
Vampire Sampling Pump
Where a dedicated sampling point may not be available it is often possible to take a representative sample using a vampire sampling pump. We are able to supply these together with adapters to fit different bottle neck sizes. We can also supply suitable sampling tubing, which comes in 30m rolls. Vampire pumps are simple and robust devices and if handled carefully will last a long time. As part of the sale we include lifetime return to base servicing – once it stops performing simply send the pump to us with your samples and we will clean it and renew any O-rings that may need replacing. We would then ship the pump back to you with some sampling bottles, labels and overspill bags.
The following advice will guide you through using a sampling pump to draw samples.
- Sampling tube O.D. sizes. Without any changes of fittings, this pump will accept the following imperial size tubing and metric sizes of similar O.D.:
- 5/16” (7.94mm)
- ¼”(6.35mm)
- 3/16”(4.76mm)
- When preparing to draw an oil sample, always insert the sampling tube completely through the coupling device with the end of the tube projecting 1/2” (or 1cm) below the top of the sample container. Tighten the coupling device knob to secure the tube (finger tight). The fluid being sampled will then flow from the tube directly into the container without coming into contact with any part of the pump. This not only prevents cross contamination of samples but with a little care, allows an unlimited number of samples to be drawn without the necessity of cleaning the pump.
- To avoid cross contamination of samples either:
- Use a new tube for every sample or
- Draw a half full bottle and dispose of the oil. Then insert a clean bottle for the sample. The volume flushed may need to be increased depending on fluid viscosity and size of bottle.
- Cutting the ends of the sampling tube to an angle of approximately 45 degrees will help prevent scraping up sludge from the inside of the dip stick pipes and/or the sides and bottom of the oil reservoirs when inserting sample tubes.
- To commence drawing an oil sample, make sure that the inlet end of the sample tube is both well below the surface of the fluid to be sampled and also well clear of the bottom. Use dip sticks or other measuring devices to measure out a suitable level. You can tie the tubing to a suitable rod or stiff wire to stop it from bending out of the way. Use a rubber band to tie a knot and mark the required length.
- Start pumping.
- Watch closely as the fluid starts flowing and when the bottle is about ¾ full, loosen the coupling device knob.
- Label each sample:
- With a printed label if available, noting the sampling date, component and lubricant hours/miles/revolutions/days if known. Record any changes in lubricant (oil change, addition of supplements, oil filtration), machinery or operation (filter change, running overloaded).
- For units being tested for the first time record all the necessary information on a blank label/docket (including details of the unit, component, sample point, lubricant, hours, sampling date, etc.)
- Place the bottles in overspill bags provided to protect the package from spillages
Vampire pumps can also be useful to sample greases. Grease is normally pulled into the tube to a certain length and left there without reaching the bottle. The ends of the tubing can then be trimmed and sealed with tissue and insulation tape for transit.
Vampire pump engine oil sampling - visual guide
This is a basic visual guide to taking engine oil samples with a vampire sampling pump. It mainly focuses on the aspects of sampling that relate to the quality of the sample. Any sampling activity should also consider the safety aspects relating to the sampling process and to the surrounding area. This guide cannot be used as a substitute for appropriate health and safety risk assessments and procedures. The items raised below should be considered as a minimal list which is far from exhaustive and cannot account for local hazards. Use appropriate PPE, which as a minimum should include goggles, gloves and protective clothing. Other PPE may be required on site and should also be worn as appropriate. Before commencing sampling ensure that all persons involved have been trained for the task and have the knowledge and permits necessary to access the relevant equipment safely. Hazards may include hot surfaces, moving machinery parts, confined or elevated spaces, chemical hazards, etc. Ensure that equipment is brought up to operating temperature before sampling – ideally this should be done under the usual operating conditions. Wear particles settle over time (the rate is affected by particle size/material and oil viscosity) and a sample from a cold machine is unlikely to be representative. Where possible take samples while the machine is operating, however this requires a risk assessment as it may not always be safe to do so.  Vampire pump sampling is often used when access is limited. This may be through a breather hole or through a dip-stick hole. When it’s the latter it is often possible to use the oil level on the dip stick to measure out a suitable length of tube. You want to avoid the bottom of the sump but also the top layer as neither are representative.
 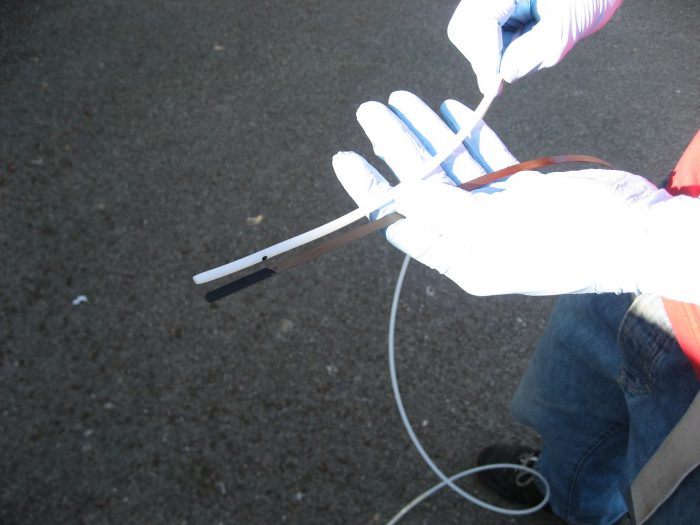 You may wish to mark the depth of insertion with a marker pen, or you can use a rubber band tied in a knot to both mark the spot and restrict insertion beyond the required level.
 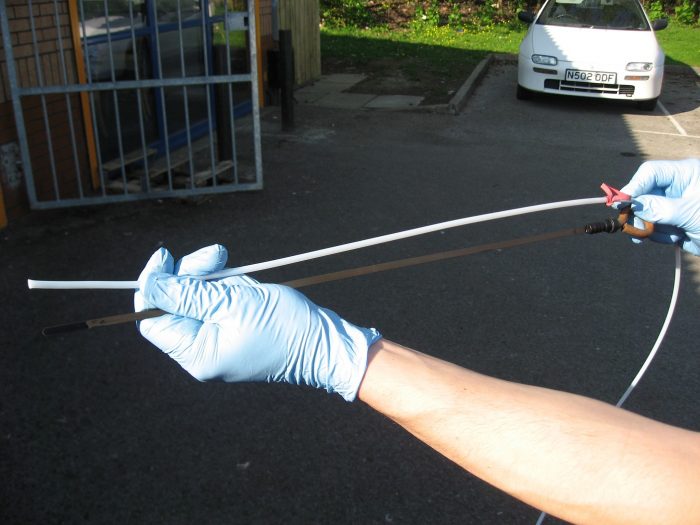 Cut the tube to a suitable length and insert the other end into the pump, so that it is about 1cm below the top of the sample container, tighten the coupling device knob to ensure a good seal. Attach a sampling container. It is prudent to flush the tubing with a portion of oil, so the first bottle of oil may need to be discarded. Once the actual sample bottle is attached and if using a pre-labelled bottle ensure that the details are correct for the unit being sampled. Insert the free end of the tube into the dip stick hole. Hold the bottle upright to avoid contaminating the pump. Begin pumping to draw the oil into the tube and then the bottle.
 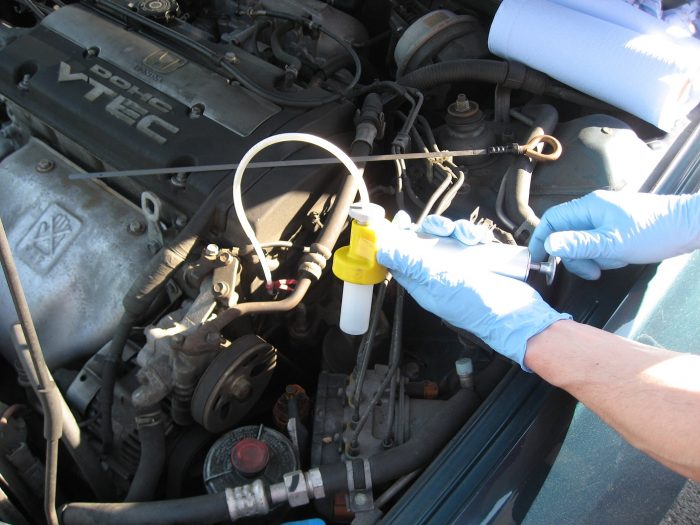 Note that more viscous oils flow more slowly and you may need to take your time to fill the bottle to the level required. While a certain strength of vacuum is necessary it doesn’t change the flow rate beyond a certain point.
 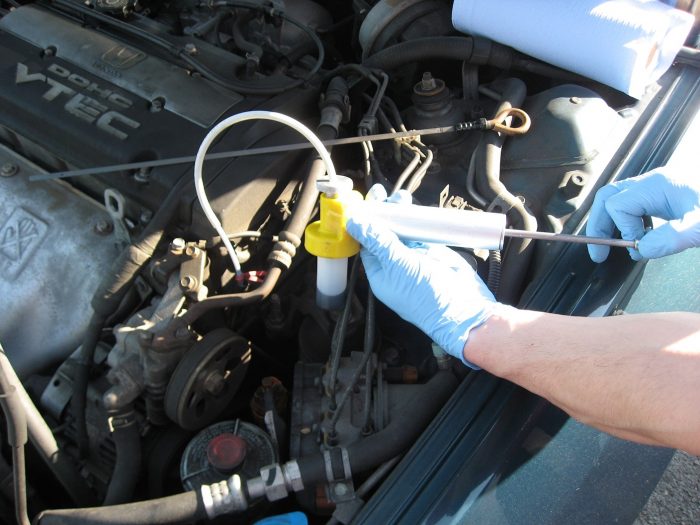 Make sure to loosen the coupling device knob early enough not to overfill the bottle – this will help keep the pump clean. In addition a certain amount of headspace is necessary for us to be able to re-homogenise the sample at the lab, and ensure a representative distribution of particles and moisture.
 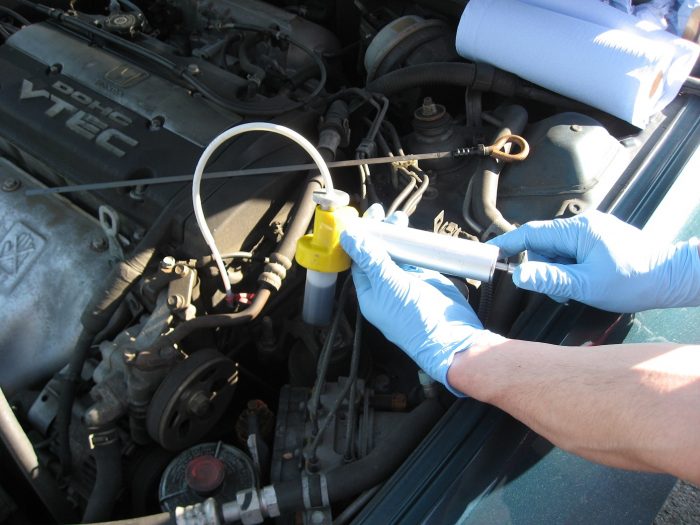 Unscrew and cap the bottle. Fill in label and docket.
 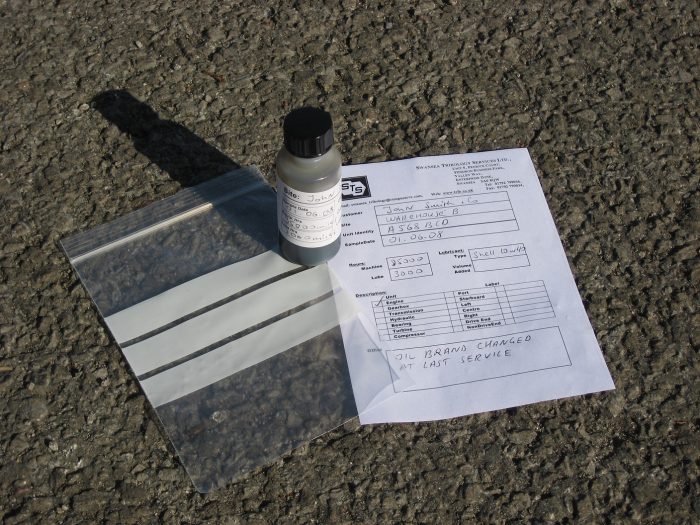 Insert into the overspill bag ready for shipping.
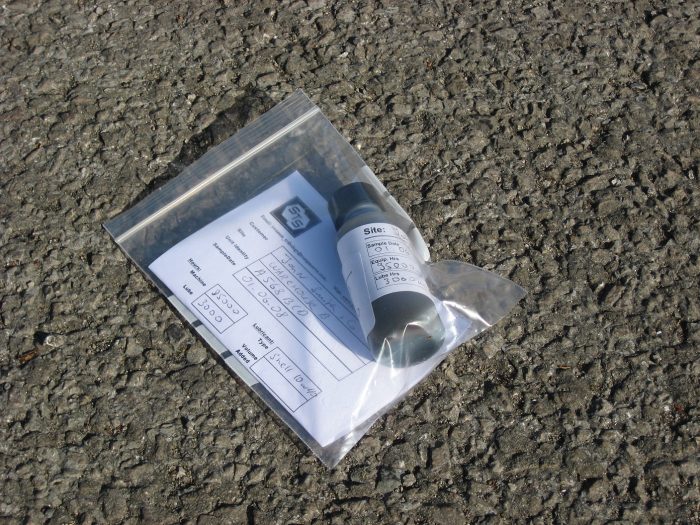
Taking samples with a syringe
Do not use pre-lubricated syringes as lubricant will contaminate sample.
Overall the procedure is similar to using the vampire pump as outlined above with points 3-7 being equally valid.
Draw the sample into the syringe then disconnect the tubing and transfer the oil into the sample bottles provided. Try not to fill bottles above ¾ line.
Other sampling equipment
A variety of sampling point types and sampling equipment exists for different applications and operating conditions. Where possible, suitable sample points should be installed. This makes most sense at the commissioning stage for new kit, however can be also be done at a later date, especially for critical equipment and where a long service life is anticipated.
For pressure lines Minimess valves can be used. For safety reasons pressure should not exceed 500psi (3.4MPa) if Minimess valves are used. For higher pressure systems helical coils may be required. For low-pressure systems a vacuum pump with a Minimess adapter may be required. Information about such systems should be available online and through suppliers.
Drain plug - upgrade to sample point
Reliability Centered Maintenance is an ongoing process with many opportunities for improvement. A good place to start is with a drain plug to sample point upgrade programme. Every time oil is changed in one of the systems replace the standard drain plug with one fitted with a sampling valve and tube (this is necessary to avoid sampling from the bottom of the sump). This will improve sampling quality without disturbing the existing schedules. The outlay is modest and even at standard drain intervals the upgrade programme should complete within a few years. The sampling process will become simpler and the sample quality will improve when compared with drop-tube and drain sampling.